Saturn Wireless Communication
(The Saturn 2 controller with NetBook)
(EMC Signs purchased from October 2010 to present)
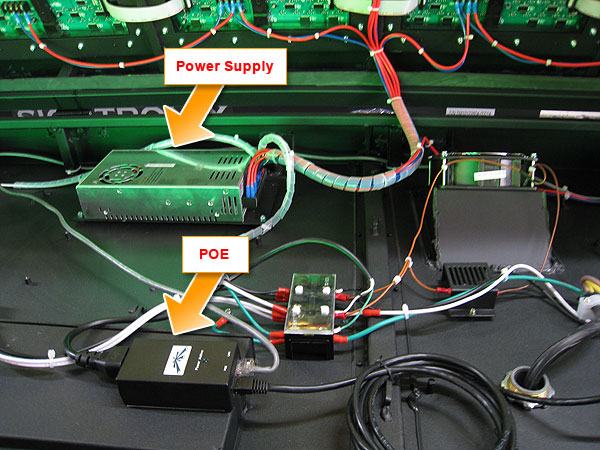
This is most likely the type of communication you have if you purchased your EMC from October 2010 to present. The components for communicating with the sign will look like:
Problem: I can’t communicate with my sign
Potential Cause: The sign has no power or isn't powered on
Troubleshooting steps:
- Check to see if the sign is powered on
- Check the AC voltage to the sign, and at the main busbar (the electrical panel in your building)
- Note: Before performing work inside your sign, please consult a professional electrician or have them work on the sign.
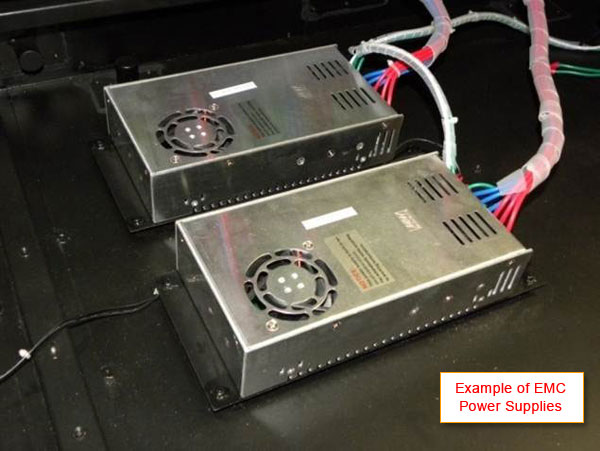
- Check the DC output on the power supplies inside your sign
Potential Cause: Sign IP Information is not correct
Troubleshooting steps:
You could possibly have the wrong Sign IP Information in your software. If this is the case then follow the Troubleshooting steps in the “Sign Setup Issue” section below.
The SignX software may not have been setup properly initially or it may have gone back to default settings. In these cases the best course of action is to go through the Sign Setup process again. These are the steps to set up the sign to communicate with SignX once again.
Open your SignX media editor software
On the upper left hand side of the software screen click on “File”
Go to “Sign Setup” (the “Sign Setup” window appears)
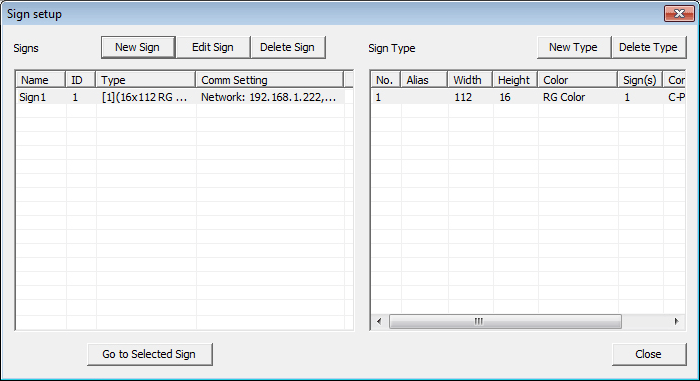
Make sure settings on the left hand side of the Sign Setup window are correct – as shown in the example here
Name = Sign1 (and Sign2 If you have a two-sided sign)
ID = 1 (and ID = 2 if you have a 2-sided sign)
The “Type” depends on what type of sign you have. This is the matrix (height and width of your sign) plus the color of your sign (RG for tri-color sign and RGB or full for full color sign). If you purchased your sign from January 2011 and beyond you can check the sticker on the laptop for your specific sign type.
IP Address = 192.168.1.222 (and 192.168.1.223 if you have a two-sided sign)
If the “Sign Setup” is incorrect as shown in the example here then follow these steps:
- Delete all the “Signs” that appear on the left hand side of the Sign Setup window. Delete them by clicking on each Sign listed and hitting the “Delete Sign” button.
- Do the same with the Sign Types shown on the right side of the window. Select the sign types listed and click the “Delete Type” button
- Next, click on the “New Type” button and the “New Sign Type” window will appear.
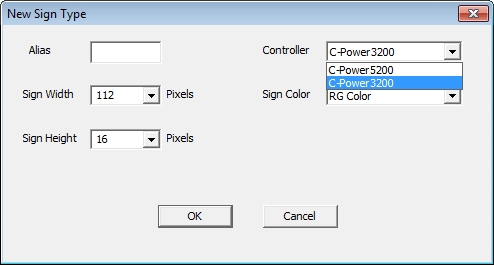
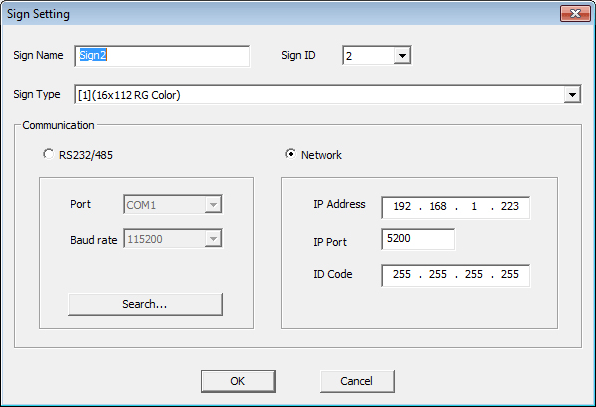
- “Sign Type” varies on the type of sign that you have. The “Sign Type” indicates the matrix of the sign or the number of pixels high by the number of pixels wide on your sign. An example of a Sign Type would be 32×144 or 56×144. If you can’t find your sign matrix on your original documentation then please contact us to get it.
- Now change the “Communication” setting to “Network”
- Change “IP Address” to 192.168.1.222
- “Port” = 5200
- “ID Code” = 255.255.255.255
- Click “OK” which then takes you back to “Sign Setup” window. Then click “OK” to exit.
If you have two-sided sign, you need to set up another sign for Sign 2
- From the “Sign Setup” window click on “New Sign” button
- In the “Sign Setting” window the “Sign Name” should read “Sign2”
- The “Sign ID” should read “2”

- “Sign Type” varies on the type of sign that you have. The “Sign Type” indicates the matrix of the sign or the number of pixels high by the number of pixels wide on your sign. An example of a Sign Type would be 32×116 or 56×144. If you can’t find your sign matrix on your original documentation then please contact us to get it.
- Now change the “Communication” setting to “Network”
- Change “IP Address” to 192.168.1.223
- “Port” = 5200
- “ID Code” = 255.255.255.255
- Click “OK” which then takes you back to “Sign Setup” window.
- Select “Sign2” >> make sure it’s highlighted in blue
- Click on “Go to Selected Sign” down at the bottom (this takes you back to the SignX software main page)
Potential Cause: The antenna is not attached/installed on the sign
Troubleshooting steps:
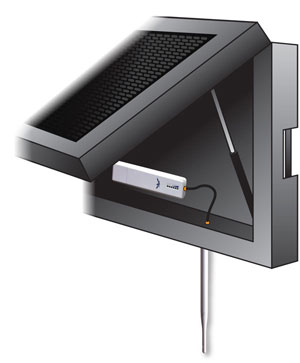
- Make sure the white antenna is mounted outside the sign.
- Note of warning: The Saturn 2 antenna (white item seen in above image) should be snug when screwed in. Don’t make it too tight or too loose.
Potential Cause: Cable that connects the Saturn 2 to the controller (inside the sign) came loose or is bad
Troubleshooting steps:
- Please consult a professional electrician before you perform any work in the sign or have the electrician perform the work.
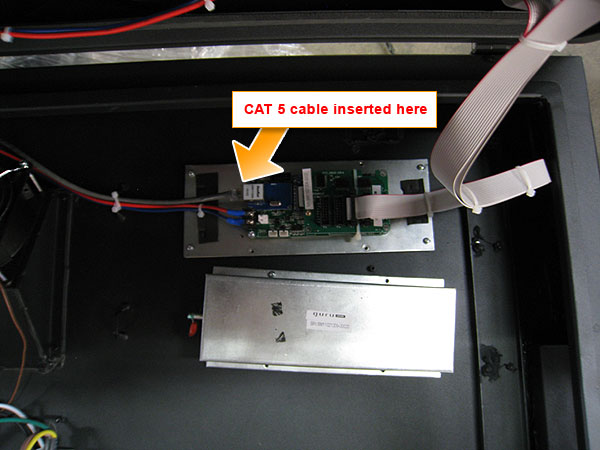
- Open your sign and verify that all Cat-5 cables are connected. A Cat-5 cable (also known as an Ethernet cable) is the same type of cable that you would use to plug into your high speed internet connection or network in your home or business.
- Verify that “LAN” light is lit on the controller (it should be a solid or blinking green light)
- Verify that signal lights next to the plug on the controller are active (green light lit, yellow flashes when sending signal)
Potential Cause: Too many other access points are on the same channel
Note: an access point is one of the choices you have for selecting the wireless network to which you want to connect
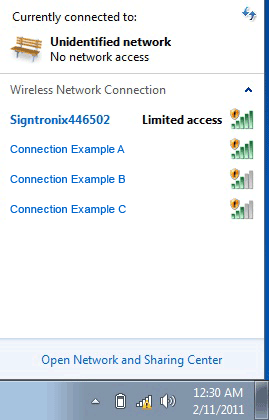
Troubleshooting steps:
If you have too many access points interfering with your signal you can determine the best channel and frequency range to use within your own connection. To accomplish this you need to use a 3rd party software like “inSSIDer” or another wireless channel scanner software to determine the frequency range that is the least used. You want to be on a frequency range that doesn’t have a lot of other traffic.
“inSSIDer” is a free software download you can obtain online. One such place is: http://www.metageek.net/products/inssider/
You can also go directly into your sign connection to see your channels and frequencies by opening your web browser (like Internet Explorer) and typing 192.168.1.1 in the address field
You need to log into your sign controller now. Your username and password is in your documentation.
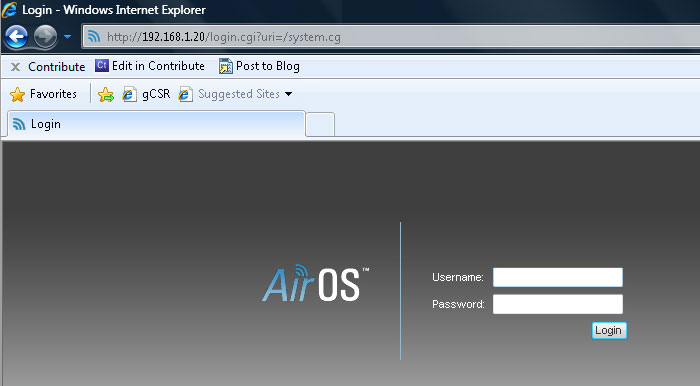
Once logged in click on “Wireless”
Go to “Frequency”
Click on “Change Frequency” and then choose a different frequency to see if it clears up the signal problem
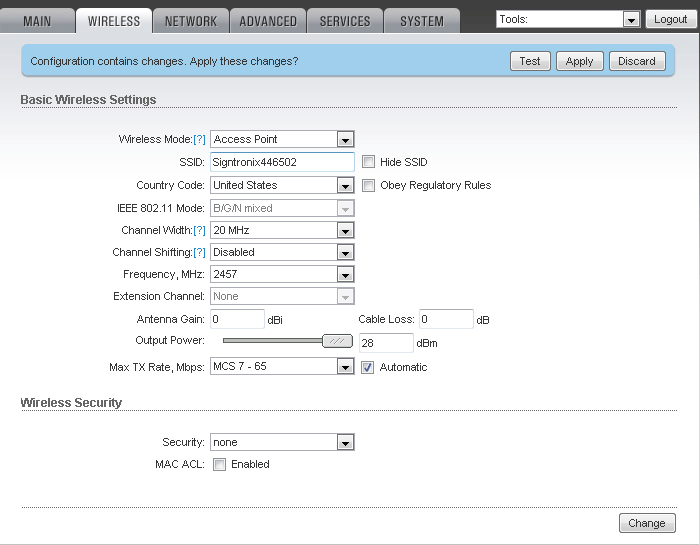
If this doesn’t fix the problem try other frequencies through the same process until you find one that does fix the problem
Potential Cause: You don't have a static IP address set up on the computer
NOTE: Do not use your wireless connection to access the Internet from your NetBook computer that came with the sign. You CAN directly connect a CAT-5 (Ethernet) cable and access the Internet that way from the computer.
Troubleshooting steps:
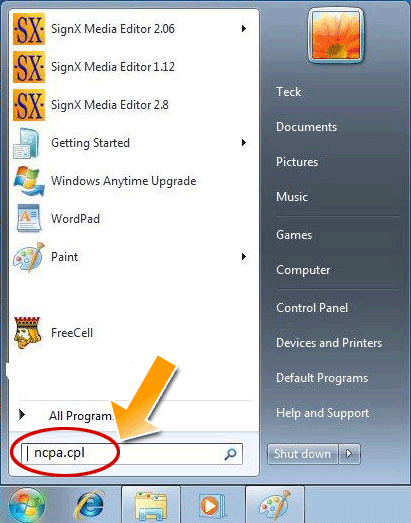
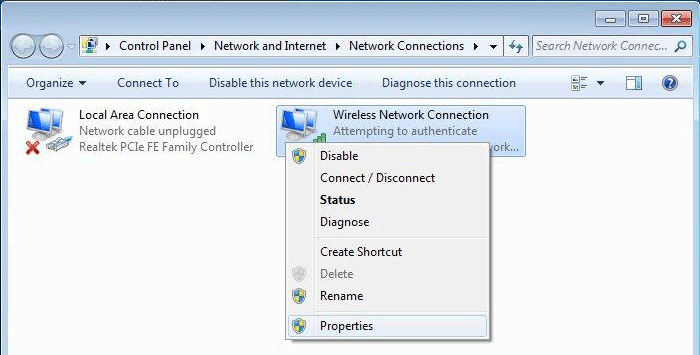
- On your Windows desktop, on the lower left hand side of the computer screen click on the START MENU. Then in the “Search programs and files” box type in “ncpa.cpl” and Enter. The Network Connections window should appear.
- Right click on “Wireless Network Connection” and click on “Properties”. The “Wireless Network Connection Properties” window appears.
- Select “Internet protocol Version 4 (TCP/IPv4)” then click on “Properties”. The Internet protocol Version 4 (TCP/IPv4) properties window appears.
- Select “Use the following IP address” and in the box type 192.168.1.25
- Click on the “Subnet mask” box. It should automatically fill out the box which should show 255.255.255.0. Click “OK” and close out the remaining windows.
Potential Cause: Your wireless radio on your computer may be off
Troubleshooting steps:
- On the lower right hand side of the computer screen look for an icon that looks like a “signal bar” much like one you would see on your cell phone. If you have a red “X” in front of the “signal bar” your wireless radio is turned off
- To turn it back on you will need to first locate the wireless radio switch on your netbook computer
- On the left hand side of the netbook where you plug in the AC power cord you will see a switch with icons on each side of the switch (see example image)
- Make sure the switch is set to the icon that has a computer with waves on each side of the computer.
![]()

Problem: I have a “Failed to Open Com” error on my software” error
Potential Cause: Software Setup Error
Troubleshooting steps:
- If you have SignX version 2.0 or later
- In your SignX software go to “File” and then select “Sign Setup”
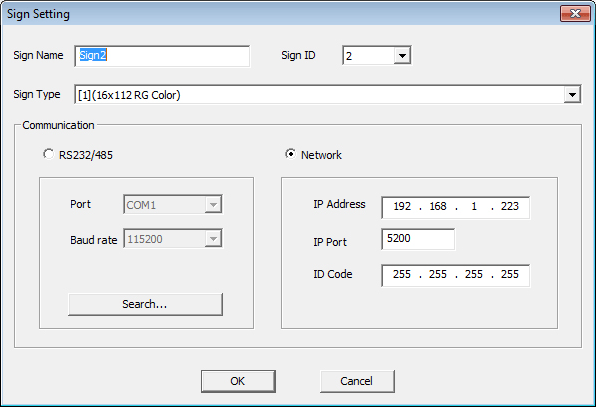
- Click on “Edit Sign” and the “Sign Setting” window appears
- Make sure that “Communication” is set to “Network”
- The “IP Address” should read 192.168.1.222 or .223
- “IP Port” should read 5200 and “ID Code” should read 255.255.255.255
- Click “OK” and on the “Sign Setup” window select the sign under the “Signs” column and then click on “Go to selected Sign”
Potential Cause: The computer isn't in line of sight with the sign
Troubleshooting steps:
- Make sure there is a clear view between your computer (or wireless transmitter) and the sign. There should be no possible interference like trees or other obstructions.
![]()
Potential Cause: The computer is too far from the sign
Troubleshooting steps:
- Make sure you’re within 100 feet of the sign when sending the message
- Make sure the wireless signal bar on your computer shows at least 2 bars
Potential Cause: Sign Setup Issue
The SignX software may not have been setup properly initially or it may have gone back to default settings. In these cases the best course of action is to go through the Sign Setup process again. These are the steps to set up the sign to communicate with SignX once again.
Troubleshooting steps:
Open your SignX media editor software
On the upper left hand side of the software screen click on “File”
Go to “Sign Setup” (the “Sign Setup” window appears)

Make sure settings on the left hand side of the Sign Setup window are correct – as shown in the example here
Name = Sign1 (and Sign2 If you have a two-sided sign)
ID = 1 (and ID = 2 if you have a 2-sided sign)
The “Type” depends on what type of sign you have. This is the matrix (height and width of your sign) plus the color of your sign (RG for tri-color sign and RGB or full for full color sign). If you purchased your sign from January 2011 and beyond you can check the sticker on the laptop for your specific sign type.
IP Address = 192.168.1.222 (and 192.168.1.223 if you have a two-sided sign)
If the “Sign Setup” is incorrect as shown in the example here then follow these steps:
- Delete all the “Signs” that appear on the left hand side of the Sign Setup window. Delete them by clicking on each Sign listed and hitting the “Delete Sign” button.
- Do the same with the Sign Types shown on the right side of the window. Select the sign types listed and click the “Delete Type” button
- Next, click on the “New Type” button and the “New Sign Type” window will appear.

- Now make sure the following information shows in your New Sign Type window:
- The “Alias” should be left blank
- In the “Controller” field select “C-power 3200” for monochrome and tri-color (RG) signs and “C-power 5200” for full color (RGB) signs
- The “Sign Width” (determined by number of pixels wide on your sign) depends on the model /type of sign you have – check your documentation to determine your sign width
- The “Sign Height” (determined by number of pixels high on your sign) depends on the model / type of sign you have – check your documentation to determine your sign height
- The “Sign Color” depends on the mode / type of sign you have. Do you have monochrome (mono), tri-color (RG) or full color (RGB)?
- Click “OK” (this takes you back to “Sign Setup” window)
- Click on “New Sign” button and the “Sign Setting” window appears
- In the “Sign Setting” window the “Sign Name” should read “sign1”
- The “Sign ID” should read “1”
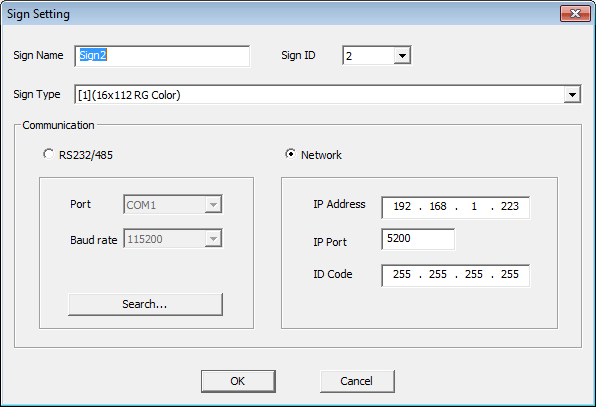
- “Sign Type” varies on the type of sign that you have. The “Sign Type” indicates the matrix of the sign or the number of pixels high by the number of pixels wide on your sign. An example of a Sign Type would be 32×144 or 56×144. If you can’t find your sign matrix on your original documentation then please contact us to get it.
- Now change the “Communication” setting to “Network”
- Change “IP Address” to 192.168.1.222
- “Port” = 5200
- “ID Code” = 255.255.255.255
- Click “OK” which then takes you back to “Sign Setup” window. Then click “OK” to exit.
If you have two-sided sign, you need to set up another sign for Sign 2
- From the “Sign Setup” window click on “New Sign” button
- In the “Sign Setting” window the “Sign Name” should read “Sign2”
- The “Sign ID” should read “2”

- “Sign Type” varies on the type of sign that you have. The “Sign Type” indicates the matrix of the sign or the number of pixels high by the number of pixels wide on your sign. An example of a Sign Type would be 32×116 or 56×144. If you can’t find your sign matrix on your original documentation then please contact us to get it.
- Now change the “Communication” setting to “Network”
- Change “IP Address” to 192.168.1.223
- “Port” = 5200
- “ID Code” = 255.255.255.255
- Click “OK” which then takes you back to “Sign Setup” window.
- Select “Sign2” >> make sure it’s highlighted in blue
- Click on “Go to Selected Sign” down at the bottom (this takes you back to the SignX software main page)
Problem: On the Netbook – when I try to connect to the wireless network – it gives me a “Unable to Connect” or “Limited Access” error
Potential Cause: Software Setup Error
Troubleshooting steps:
- When you receive these error message boxes just close the box and proceed as normal.
- In most instances, even if you see one or both of these errors, you should be able to still communicate with your sign. Proceed with the Sign Setup steps as normal.
Problem: Part of my sign doesn’t light up (either an entire section or pixels on the sign)
Potential Cause: Temporary electronic glitch
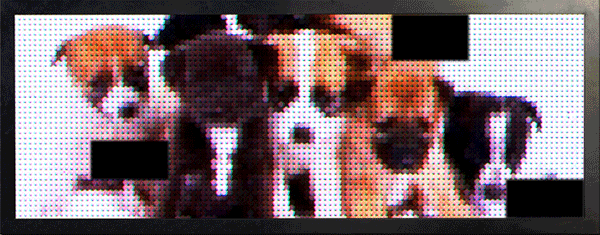
Sometimes a module may just go out because of a small glitch in the electronics but it doesn’t cause a permanent outage. A simple reboot of the sign fixes this issue in most instances.
Troubleshooting steps:
- Reboot the sign. This must be done at your electrical box by simply turning power off then back on to the sign circuit.
Potential Cause: Loose ribbon cable or bad module
Please use a professional electrician to work inside the sign
Troubleshooting steps:
- ** Make sure your sign is powered down before your electrician performs any work **
- Have a professional electrician open your sign
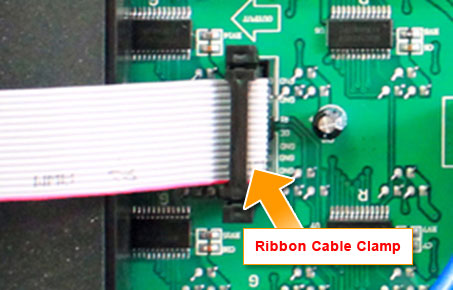
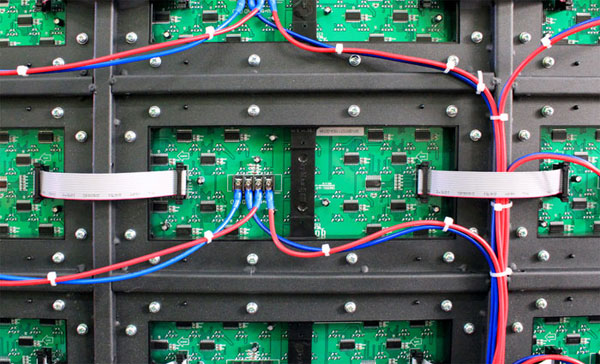
- Have the electrician unplug the ribbon cable from the module (or part of the sign) that isn’t lighting up
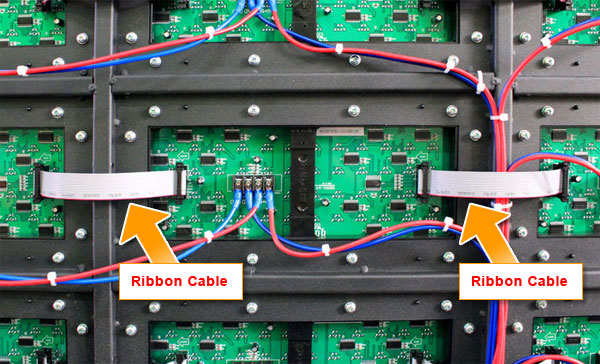
- See closeup of a ribbon cable clamp. Here is where you unplug the ribbon cable from the module.
- Plug the ribbon cable back into the slot from which it was just unplugged
- If the module still doesn’t light up then try unplugging that same ribbon cable and plug it into a different module. We are now trying to determine if it is a ribbon cable failure or a module failure.
- If the 2nd module still lights up after connecting the potential problem ribbon into the socket, then it is a module issue.
- If the 2nd module that WAS working now does not work, then it is most likely a ribbon cable issue.
- In either case call Signtronix technical support at (800) 729-4853 ext. 402 to report the problem and order replacement parts.
Potential Cause: Bad Power Supply or Power Cable
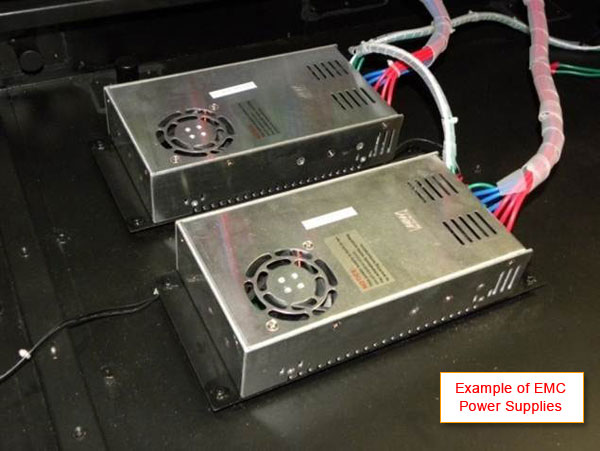
For this troubleshooting step you must have an electrician go inside your sign to check the power supply and power cables.
Troubleshooting steps:
- ** Make sure your sign is powered down before your electrician performs any work **
- Have a professional electrician open your sign and perform the work
- Put a power meter on the module that isn’t lighting up and make sure it’s getting power (5V) or (7.5V) DC power
- Next put a power meter on the power supply and check the voltage. It should also be getting 5V or 7.5V
- If the power on the power supply is fine but the module is not, then it’s most likely a bad cable or module. If the power supply is not getting power, then the power supply is bad. Call Signtronix for maintenance options.
Problem: I sent a message to my sign and the software said the message was sent successfully, but the sign still displays the old message
Potential Cause: It's a Sign Setup issue
Troubleshooting steps:
Open your SignX media editor software
On the upper left hand side of the software screen click on “File”
Go to “Sign Setup” (the “Sign Setup” window appears)
img class=”aligncenter size-full wp-image-1356″ src=”http://www.signtronix.com/wp-content/uploads/2016/04/guide_Saturn-Sign-Setup-6.gif” alt=”guide_Saturn-Sign-Setup (6)” width=”700″ height=”381″ />
Make sure settings on the left hand side of the Sign Setup window are correct – as shown in the example here
Name = Sign1 (and Sign2 If you have two-sided sign)
ID = 1 (and ID = 2 if you have a two sided sign)
The “Type” depends on what type of sign you have. This is the matrix (height and width of your sign) plus the color of your sign (RG for tri-color sign and RGB or full for full color sign). If you purchased your sign from January 2011 and beyond you can check the sticker on the laptop for your specific sign type.
IP Address = 192.168.1.222 (and 192.168.1.223 if you have two-sided sign)
If the “Sign Setup” is incorrect as shown in the example here then follow these steps:
- Delete all the “Signs” that appear on the left hand side of the Sign Setup window. Delete them by clicking on each Sign listed and hitting the “Delete Sign” button.
- Do the same with the Sign Types shown on the right side of the window. Select the sign types listed and click the “Delete Type” button
- Next, click on the “New Type” button and the “New Sign Type” window will appear.
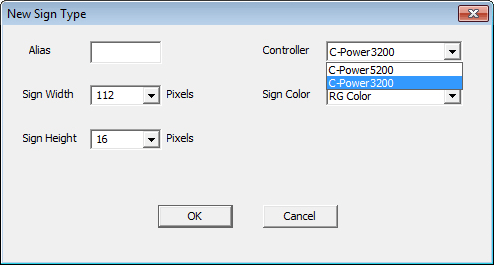
- Now make sure the following information shows in your New Sign Type window:
- The “Alias” should be left blank
- In the “Controller” field select “C-power 3200” for monochrome and tri-color (RG) signs and “C-power 5200” for full color (RGB) signs
- The “Sign Width” (determined by number of pixels wide on your sign) depends on the model /type of sign you have – check your documentation to determine your sign width
- The “Sign Height” (determined by number of pixels high on your sign) depends on the model / type of sign you have – check your documentation to determine your sign height
- The “Sign Color” depends on the mode / type of sign you have. Do you have monochrome (mono), tri-color (RG) or full color (RGB)?
- Click “OK” (this takes you back to “Sign Setup” window)
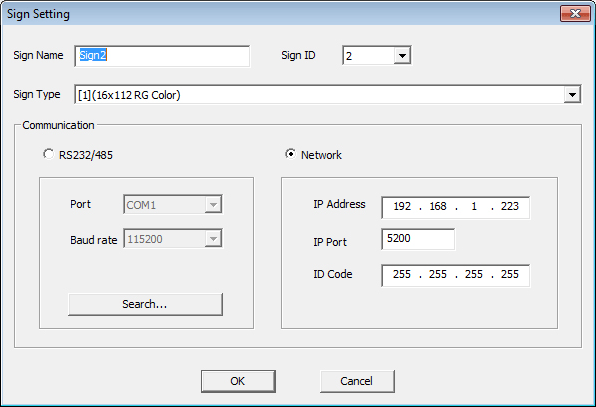
- Click on “New Sign” button
- When the “Sign Setting” window appears the “Sign Name” should read “Sign1”
- The “Sign ID” should read “1”
- “Sign Type” varies on the type of sign that you have. The “Sign Type” indicates the matrix of the sign or the number of pixels high by the number of pixels wide on your sign. An example of a Sign Type would be 32×144 or 56×144. If you can’t find your sign matrix on your original documentation then please contact us to get it.
- Now change the “Communication” setting to “Network”
- Change “IP Address” to 192.168.1.222
- “Port” = 5200
- “ID Code” = 255.255.255.255
- Click “OK” which then takes you back to “Sign Setup” window. Then click “OK” to exit.
If you have two-sided sign, you need to set up another sign for Sign 2
- From the “Sign Setup” window click on “New Sign” button
- When the “Sign Setting” window appears the “Sign Name” should read “Sign2”
- The “Sign ID” should read “2”
- “Sign Type” varies on the type of sign that you have. The “Sign Type” indicates the matrix of the sign or the number of pixels high by the number of pixels wide on your sign. An example of a Sign Type would be 32×144 or 56×144. If you can’t find your sign matrix on your original documentation then please contact us to get it.
- Now change the “Communication” setting to “Network”
- Change “IP Address” to 192.168.1.223
- “Port” = 5200
- “ID Code” = 255.255.255.255
- Click “OK” which then takes you back to “Sign Setup” window.
- Select “Sign2” >> make sure it’s highlighted in blue
- Click on “Go to Selected Sign” down at the bottom (this takes you back to the SignX software main page)

Problem: The time on my computer is correct but the sign is not displaying the correct time
Potential Cause: It's a Sign Setup issue
Troubleshooting steps:
- NOTE: Do NOT Use the “Time” Icon in your main programming window to change the time
- Make sure your computer has the right time set
- If your computer has the right time… Open the SignX software:
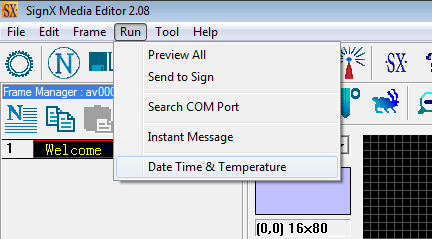
- Click on “Run” in the top menu then select “Date, Time & Temperature”
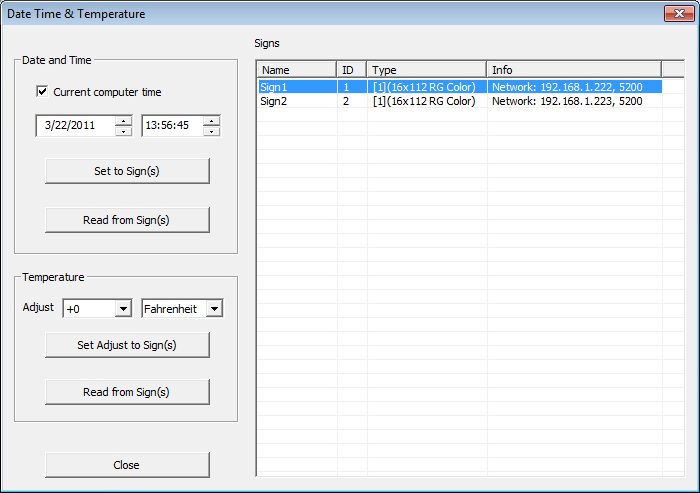
- The “Date, Time & Temperature” window pops up
- It will display the correct time on the window but still click the up and down buttons next to the time until you see the right time then click “Set to Sign”
- Now check the sign. It should be displaying the correct time.
Problem: I programmed part of my message to scroll, and I told it to scroll only one time, but the message scrolls 3 or 4 times instead of just the one)
Potential Cause: It's a Software issue
Potential Cause: It’s a Software issue
Troubleshooting steps:
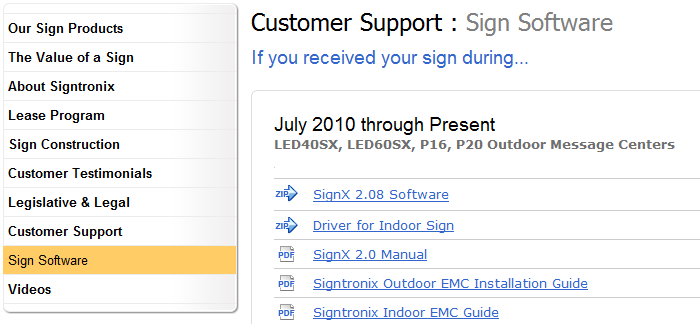
- This is a bug that occurs with SignX version 2.06. To eliminate this issue please upgrade to SignX version 2.08 which can be found at the Signtronix.com website.
- Visit www.Signtronix.com
- Click on the “Customer Support” link on the left
- Click on the “Sign Software” link that appears “Customer Support”
- Now download and install the “SignX 2.08 Software” that is at the top of the page
